
Why the Frozen Snickers Ice Cream Cake Is a Must-make
If you’re looking for a dessert that combines indulgence with nostalgia, the Frozen Snickers Ice Cream Cake is a must-make.
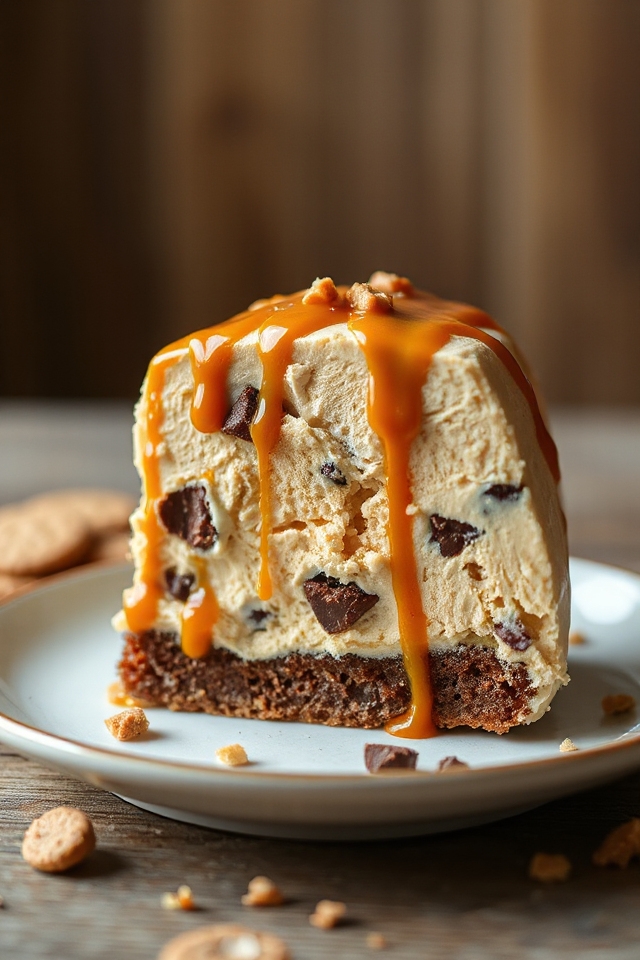
I remember the first time I tried it; the creamy chocolate ice cream blended with peanut butter took me back to my childhood. Each layer offers a satisfying crunch from the chocolate wafers, perfectly balanced by the rich caramel.
It’s an impressive centerpiece for any gathering, yet surprisingly simple to assemble. Plus, you can prepare it in advance, making it a stress-free option for entertaining.
Trust me, once you serve this cake, your friends and family will be begging for seconds!
Ingredients of Frozen Snickers Ice Cream Cake
When it comes to whipping up a dessert that’s both fun and indulgent, the Frozen Snickers Peanut Butter Ice Cream Cake is a total winner. Imagine creamy chocolate ice cream meeting the rich, nutty goodness of peanut butter, all layered with crunchy chocolate wafers and drizzled with luscious caramel. It’s like a party for your taste buds, and it’s surprisingly easy to make.
Plus, you can prepare it ahead of time, which means less stress when it’s finally time to serve. Just picture the excitement on your friends’ faces as they dig into this delightful treat—who wouldn’t want a slice?
Here’s what you’ll need to gather for this scrumptious ice cream cake:
- 2 pints chocolate ice cream
- 1 cup chunky peanut butter
- 32 Nabisco Famous chocolate wafers
- 1 ½ cups caramel sauce (or butterscotch sundae sauce)
Now, let’s talk about ingredient choices. When it comes to the chocolate ice cream, I always go for a high-quality brand because the flavor really makes a difference. You want that deep, rich chocolate that pairs beautifully with the peanut butter.
And speaking of peanut butter, if you’re a fan of smooth peanut butter, feel free to swap it in; just remember, the chunky variety gives you those delightful little bits to munch on. As for the caramel sauce, you can either go with store-bought or make your own if you’re feeling adventurous (or have a bit of extra time).
Just be ready to have some sticky fingers, because there’s a good chance you’ll sneak a taste or two along the way. Who can resist that?
How to Make Frozen Snickers Ice Cream Cake
Making your very own Frozen Snickers Peanut Butter Ice Cream Cake is like throwing a little party in your kitchen. First things first, grab your 2 pints of chocolate ice cream and let them soften in a large bowl. I usually let mine sit out for about 10-15 minutes, just long enough to soften but not melt into a puddle.
Once it’s nice and creamy, it’s time to mix in 1 cup of chunky peanut butter. This is where the magic happens. As you fold the peanut butter into the ice cream, you’ll get those delightful little chunks that make every bite oh-so-satisfying. Trust me, you’ll want to sneak a spoonful or two at this point—no judgment here.
Now that your ice cream mixture is ready, let’s layer it all up in a 9×5-inch loaf pan. Start by lining the pan with plastic wrap, leaving a generous overhang. This will be your best friend later when you’re trying to get that cake out.
Place 8 of those Nabisco Famous chocolate wafers at the bottom; don’t worry if they overlap a bit, they’re all going to be friends in the ice cream party. Spread one-third of your ice cream mixture on top, smoothing it out like you’re frosting a cake. Drizzle ½ cup of caramel sauce over that, and let the layering begin!
You’ll repeat this process two more times, ending with another layer of 8 chocolate wafers on top. Once everything is stacked, press the top layer down gently to keep it all together. Now, wrap it up tightly in that plastic wrap and pop it in the freezer for about 6 hours, or until it’s rock solid.
When you’re ready to serve, take it out and let it sit for a few minutes—this is the part where you hold your breath, hoping that it will come out of the pan in one piece. If it gives you trouble, just dip the bottom of the pan in hot water for a few seconds, which usually does the trick.
Then, use the plastic wrap to flip it onto a serving platter. Peel away the wrap and, voilà, you have a stunning Frozen Snickers Peanut Butter Ice Cream Cake ready to be sliced and devoured. Just don’t forget to take a moment to admire your creation before diving in. It’s a labor of love, after all. Enjoy!
Frozen Snickers Ice Cream Cake Substitutions & Variations
While the classic Frozen Snickers Peanut Butter Ice Cream Cake is a delightful treat as is, there are plenty of ways to customize it to fit your taste preferences or dietary needs.
For a lighter option, try using low-fat ice cream or yogurt instead. You can swap out the chunky peanut butter for almond or cashew butter for a different flavor.
If you’re looking for a nut-free version, replace the peanut butter with a creamy sunflower seed spread.
To add a unique twist, incorporate crushed pretzels or different candies between the layers.
Get creative and make it your own!
What to Serve with Frozen Snickers Ice Cream Cake
A delightful Frozen Snickers Ice Cream Cake deserves equally delicious accompaniments to elevate your dessert experience.
I love serving it with a drizzle of warm caramel or chocolate sauce for that extra indulgence. Fresh whipped cream adds a light and airy contrast, while chopped peanuts or Snickers pieces provide a delightful crunch.
For a revitalizing touch, consider pairing it with fresh fruit like strawberries or bananas. If you’re feeling adventurous, a scoop of vanilla bean ice cream on the side enhances the flavor profile beautifully.
These combinations not only complement the cake but also create a truly memorable dessert moment.
Additional Tips & Notes
When preparing your Frozen Snickers Peanut Butter Ice Cream, I recommend using high-quality chocolate ice cream for a richer flavor.
Don’t skip the chunky peanut butter; it adds delightful texture. If you’re feeling adventurous, try adding crushed Snickers bars or chopped nuts for extra crunch.
For a smoother consistency, let the ice cream soften a bit before mixing in the peanut butter. Remember, freezing the cake for at least six hours guarantees it holds its shape when sliced.
Finally, you can assemble this treat up to a week in advance, making it perfect for last-minute gatherings. Enjoy every delicious bite!